If you’ve been having problems with your iPhone or iPad screen not acting quite as responsive as usual, don’t panic: You can try out plenty of quick and easy tricks before heading to your closest Genius Bar.Must Read:iPhone white screen
Get five tips for fixing an unresponsive iPhone screen in our how-to video:
Clean your iPhone or ipad screen
Let’s be honest: Our iPhones are always by our sides. This means dirt and gunk collects on the screen and could end up interfering with our devices’ performance.
Take a close look at your screen. Does it look oily? Is anything else on there that might be preventing the screen from working properly? If so, give it a good clean with a decent screen wipe or soft cloth. If it’s especially dirty, you might need to dampen the cloth with water. Just make sure not to soak the screen unless you’ve got the iPhone 7 or 7 Plus (they’re waterproof).Must Read:iPhone white screen
Delete and reinstall apps
If your screen isn’t responding within a particular app but seems fine when you exit it, the problem could lie with that app rather than the screen itself. First, check for updates for the app. You could be experiencing a bug known to the developers — and they might have fixed it. If no update is available, simply delete the app and reinstall it from the App Store.
Perform a hard reboot
Sometimes all your phone needs is a reboot to fix an unresponsive screen. If your screen is completely frozen, I recommend doing a hard reboot, which is kind of like shutting down a computer by pulling the plug out of the wall. If you’re using an iPhone 6s or older, simultaneously hold down the Home button and the power button until you see the Apple logo. If you’re using an iPhone 7, without a physical Home button, simultaneously hold the volume down button and the sleep/wake button until the phone reboots.
Free up space on your device
Like a Mac or PC, if your iPhone or iPad is getting low on storage space the device can get laggy. Other problems will likely occur, including your screen seizing up. Check the amount of storage available by going to Settings > General > Storage and iCloud Usage > Manage Storage. If you’ve got less than a few hundred MB available, this could be the root cause of your unresponsive screen.
20 IOS 11 Tips And Tricks You Need To Know To Master Your IPhone Or IPad 2017
The public beta of iOS 11 has gone live, and while the usual beta rules apply - don’t install it on any device you can’t afford to mess up or live without and back up anything important - it’s a stable and generally solid update that introduces all kinds of goodies.
It’s particularly good on recent iPads, for which it blurs the lines between mobile and macOS, but it has some fantastic features for iPhones too. Just watch the battery life - it’s a bit of a hog.Must Read:How to import contacts from iPhone to mac?
We’ve already seen what features Apple has put into iOS 11, so now it’s time to explore the little and big ways iOS 11 can make your Apple life even lovelier. These are our favorite iOS 11 tips and tricks that we think you need to know about. Must Read:How to empty trash on iPhone?
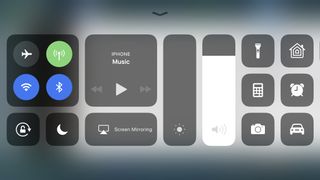
1. Customize the Control Center
The new Control Center is quite different than in iOS 10, not least because it’s put everything on a single page instead of spread over multiple cards.
If you don’t like the default choices it’s simple to customize Control Center to your liking: go to Settings > Control Center > Customize Controls and you can add and remove items or rearrange the order in which they appear.Must Read:erase iPhone without password
2. Turn to the dark side
If iOS 11 is too white for you, it’s easy to make it darker: go into (deep breath…) Settings > General > Accessibility > Display Accommodations > Invert Colors and switch on Smart Invert.
Unlike a normal invert, which reverses the colors of everything on screen, Smart Invert doesn’t mess with images and other media: it’s effectively a Dark Mode for iOS.
3. Get 3D Touch without 3D Touch
If your iPhone doesn’t support 3D Touch, which enables you to get additional options by hard-pressing icons, iOS 11 brings something very like it to the Control Center - but not to the rest of iOS.If you lost videos from iOS Camerall Roll which are nowhere to download again, you can use Gihosoft iPhone Data Recovery to get back deleted videos from iOS device including iPhone, iPad and iPod Touch.
Jihosoft iPhone Backup Extractor Extract and recover all types of data from iPhone backup files, such as camera roll photos, videos, SMS, contacts, reminders, WhatsApp, and etc.
If you long-press the buttons in Control Center you’ll get the 3D Touch actions, so for example long-pressing the torch icon brings up the torch’s intensity settings.
4. Give Siri the finger
One of the big problems with voice-controlled devices is that you don’t always want to use your voice: “Hey, Siri! Search the web for fungal foot cream!” isn’t something you generally want to shout on the bus.
If you go into Settings > General > Accessibility > Siri and enable Type To Siri, long-pressing on the Home button brings up the keyboard. “Hey Siri” still works, and if you’ve enabled voice feedback that still works too.
5. Make Live Photos look right
Are you as annoyed as we are by Live Photos’ uncanny ability to make the very worst frame the photo preview? Get iOS 11, head for the Live Photo you want to fix and tap on the Edit button.
You should now see a slider that you can use to walk through the Live Photo frame by frame. When you find the one you want, tap Make Key Photo to replace the crappy preview with that frame.
6. Tap and drag to open apps
The new Dock makes it easy to multitask: for example, if you tap and drag the Messages icon to the side of the screen it’ll open in a narrow window so that you can send or read messages without exiting the app you’re already using.
You can put apps side by side as before, and you can replace an open app by dragging the new app’s icon over it.
7. Annoy your Android friends
Live Photos don’t work on Android, but if you record one in iOS 11 and apply the Loop or Bounce effect then they’re sent via MMS as MP4 files.
That’s a sure-fire way to stuff their smartphones with unnecessary frames, but don’t forget that sending MMS messages usually costs money. Don’t bankrupt yourself just to wind up your friends.
8. Get more storage space
iOS 11 introduces several new ways to improve your available storage, including new, more efficient file formats for photo and video - although those formats only apply to new images or recordings, not ones you’ve already got.
In addition, you can free up storage by enabling iCloud sync for Messages in Settings > Messages > Messages on iCloud and by deleting message attachments from the same page.
You can also “offload” apps, which deletes them but remembers their data: when you want to use them again you just reinstall and they pick up from where you left off. That option’s in the iCloud storage bit of Settings.
9. See more in Notes
You can make your Notes contain much more information in the same space: use tables to present lists in a more efficient format than bullets, and use Scan Documents to embed printed documents for effortless recall and sharing.
The scanning is superb and includes filters to make the results even more legible.
10. Make your pictures pop
This one’s quite subtle, but if you look at the available color filters in the Photos app you’ll see that Apple has added some new ones such as Vivid Warm, Dramatic Cool and our new favorite, Silvertone. That latter one works brilliantly on almost anything, and it’s particularly nice on portraits.
11. Block FaceTime photography
The new FaceTime Live Photo feature is fun and enables you to take a photo without the on-screen interface bits showing, but it also means somebody can take a Live Photo of you mid-call.
If you’d rather not let that happen, you can disable the Live Photo option by going into Settings > FaceTime - but bear in mind that all you’re disabling is this specific feature, not iOS’s ability to take screenshots.
12. Don’t leave unwanted messages on other devices
There’s another big benefit to Messages’ new cloud-based system: if you’ve enabled Messages on iCloud then when you delete a message on one of your devices, it’s deleted from every device.
That means the end of the possibly disastrous privacy loophole where you need to manually delete messages from all your devices.
13. Zoom in on Maps
You’re familiar with pinching to zoom in and out, but in iOS 11 the iPhone Maps app gets another way to zoom. Double-tap with your finger or thumb and keep it pressed down on the screen. Move it up to zoom in on the map, and move it down to zoom out.
14. Track a flight
Picking family, friends or colleagues up from the airport? Type the flight number into Safari’s address bar and you’ll see details of the flight pop up. Tap on that and you’ll see not just the flight times and status, but a real-time map of where the plane actually is.
15. Type one-handed without tears
If you press and hold the globe/emoji icon on your iPhone keyboard you’ll see three new icons for the keyboard: left, normal and right.
The “normal” one is self-explanatory, but the other two options compress the keyboard to about 3/4 of its normal size and put it to the left or right of the screen. It makes the letters much easier to reach with your thumb, and it’s absolutely brilliant on the iPhone 7 Plus.
16. Perfect your portraits
You might not have noticed this, but the iPhone 7 Plus’s Portrait mode doesn’t benefit from your camera’s optical image stabilization. That’s changed in iOS 11, and you can also improve your chances of getting the shot you want now that Portrait mode also works with HDR (High Dynamic Range) mode and the flash.
17. Scribble on your screenshots
If you like to annotate screenshots, you’ll like the way iOS 11 handles them. Now, when you take a screenshot (by pressing home and power as before) you’ll see a little thumbnail appear.
Leave it and it disappears, but if you tap it you’re taken to the editing screen where you can crop, annotate and generally scribble on your shot using iOS 11’s Markup tools and magnifier.
18. Don’t pine for your Power button
If your Power button isn’t working, you can still shut down and restart your iPhone: go into Settings > General and flip to the very bottom of the list. You’ll see the new Shut Down option, which brings up the familiar Slide To Power Off control.
19. Scan QR codes
It’s been a long time coming, but your phone’s camera now knows if it’s looking at a QR code and will perform the appropriate function when it sees it - so for example if it contains a link that’ll be opened in Safari.
Unlike on Android, the iPhone doesn’t get sniffy about positioning the QR code perfectly: it’ll scan quite happily even if you’re at an angle from the printed code.
20. Drag and drop to something specific
You know you can drag and drop in the iPad now, but you might not know how useful that can be: when you’re dragging from one app to another, the destination app’s icon is spring-loaded.
That means if you drag a photo over Notes and keep your finger pressed, Notes will allow you to open a specific note to drag the photo into.
Windows couldn’t automatically bind the IP protocol stack to the network adapter
In this case, the built-in troubleshooter gave an error instead of fixing the issue, which means we would have to fix it manually. It is believed that this error occurs after the user makes changes to the network settings of the computer. If you are facing this error, I suggest you go through the list of fixes and see which you want to try and in which order.Related Read:iMyFone Umate
1: Update Windows
The issue could be with the drivers as suggested in the error. To isolate this probability, you could update Windows and restart the system. Updating Windows, updates the drivers as well.
2: Update the drivers from the manufacturer’s website
Since, the error message specifies that the issue is with the drivers, before moving any further, we need to be sure that this cause is isolated. If a Windows Update does not fix the problem, trying re-installing the network adapters from the manufacturer’s website. Please contact the manufacturer for more information on the same.
3: Reset the Network Adapter settings
The Network Adapter settings might have changed any recently. To reset them to default, you could reset TCP/IP and see if that works for you.
4: Change a few Adapter settings
If resetting the Adapter settings does not work, you could try changing a few of them to the most recommended ones. The process would be as follows:
1] Press Win + X, and in the list that pops up, select Control Panel. Open the Network and Sharing Center. It might be under the category Network and internet.
2] Click Change Adapter Settings in the left pane. Right-click the adapter in use (Ethernet or Wi-Fi) and click on Properties.
In the list titles “The network uses the following items,” ensure that the following items checked, and uncheck all other options:
Client for Microsoft Networks
QoS packet scheduler
File and Printer Sharing
Internet Protocol v6
Internet Protocol v4
Link-Layer Topology Discovery Mapper I/O driver
Link-Layer Topology Discovery Reminder.
5: Disable the IP Helper Service
1] Press Win + R and type “services.msc” in the Run window. Press Enter.
2] The list of services is arranged in alphabetical order. Scroll to IP Helper Service and right-click on it. Select Properties.
3] Set the startup type to “Disabled” and click Apply to save the settings.
4] Change the service status to Stop and save the settings by clicking on OK.
I am sure that something here will help you.
Forgot iPhone Passcode?
Part 1. If I Reset My iPhone What Will I Lose?
After encountering a major setback in your device and the only available solution is to reset, then you need to know that you will lose some data and files (if not all). However, different reset leads to different results.
There are different kinds of reset method, these methods determine the outcome of your device and answer the question: “If I reset my iPhone, will I lose everything?”. These methods include:
A Reset Through Settings on iPhone
This is a conventional method and it is very easy. It involves only your device and tapping a few buttons in order to restore the phone. In this method, there are 2 approaches to this;
If you reset all settings, it will only be temporary and not all files or data will be lost. In fact, some junk and temp files i.e. it keeps your apps and data but will reset all personal preferences and network settings.
If you erase all content and settings, it will delete all data on your iPhone, including songs, videos, images, etc. It is somewhat similar restoring back to factory settings.
B Reset Through iCloud and iTunes
One of the available methods Apple has put in place for iPhone users to reset their phones. It involves making a connection with a PC and logging into iCloud or launching iTunes respectively. This method is however complicated but resets through iTunes and iCloud will make you lose all your files and data; more like restoring back to factory settings. If you need to get back your data you may need to get help from some professional recovery tool.
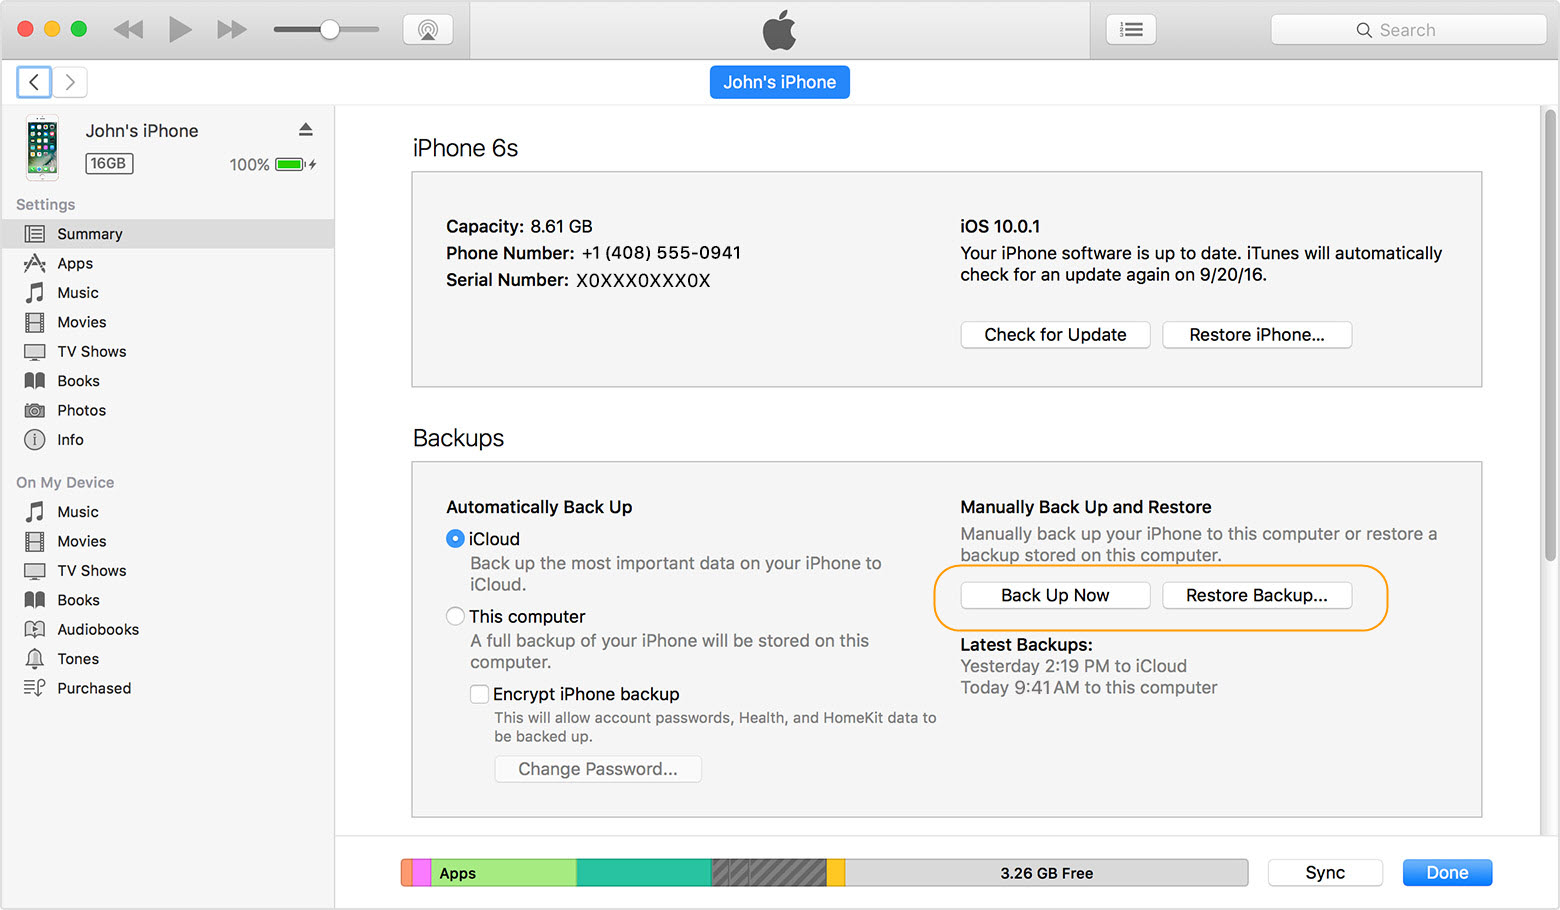
Part 2. How to Restore iPhone after Reset via iTunes
When you reset iPhone with any of the method listed above, no doubt, some important files could be deleted or lost and you would want to restore them. In order to do this, you can restore iPhone from an iTunes backup if you have backed up before. Apple set up this method so the maximal use of iTunes can be put into action and one can be able to backup devices in case of future problems.
Step 1: Connect your iPhone to a PC.
Step 2: Make a quick launch of iTunes and go to File menu, select “Devices”.
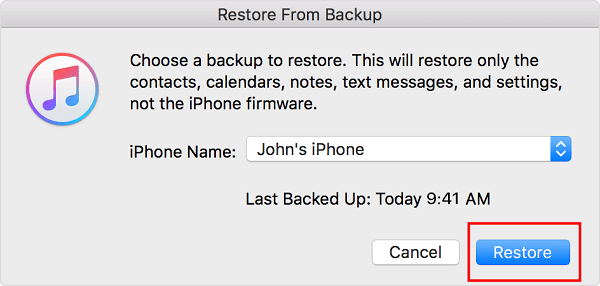
Step 3: Choose “Restore Backup”.
Step 4: Pick a recent backup on the basis of size and date, and click on “Restore”.
After all these steps, you now have your iPhone restored via iTunes, and this is also very useful also after reset.If you ever lost or accidentally deleted data from your iOS device, you can use the professional Gihosoft iPhone Data Recovery software to retrieve important data from iPhone, iPad or iPod Touch even without backup.
Jihosoft iPhone Backup Extractor Extract and recover all types of data from iPhone backup files, such as camera roll photos, videos, SMS, contacts, reminders, WhatsApp, and etc.